Imagine this: You’re finally at your dream Disney park, the sun is shining, and you’re ready for magical miles. But after just an hour, your feet start to scream! Sound familiar? Everyone knows that a Disney trip involves a *ton* of walking—think marathon distances, but with more churros.
Choosing the right footwear is the single most critical decision for park survival. Forget flimsy sandals or brand-new sneakers; the wrong shoes lead to blisters, sore arches, and a very grumpy vacation. The pressure to find the perfect blend of support, cushioning, and style for those long, sunny days can feel overwhelming. You need a shoe that conquers concrete without sacrificing your pixie dust energy.
This post cuts through the confusion. We’ve tested the top contenders to bring you the definitive guide on the best tennis shoes built specifically for Disney days. You’ll learn exactly what features matter most to keep your feet happy from rope drop to fireworks. Get ready to step into comfort and conquer every castle photo opportunity!
Top Tennis Shoes For Disney Recommendations

- GIRLS SHOES: Step into fun style with these girls' sneakers led light up shoes featuring Disney Princess, Little Mermaid, Stitch, Minnie, Frozen Elsa & Anna, and Paw Patrol toddler shoes.
- LED SHOES: Perfect for toddler girl sneakers and little girl shoes, these girls light up shoes LED athletic shoes are great for school shoes for girls, birthday parties and casual wear.
- DISNEY PRINCESS: Are you a fan of disney princess toys, disney princess dolls, disney princess backpack or even with princess tiana? These Disney princess shoes are perfect light up shoes for girls
- GIRLS SNEAKERS: Available in toddler shoes girl size 5-10 and little girls shoes sizes 11-12. Girls tennis shoes come in fun colors: pink shoes, purple shoes, silver sneakers and purple shoes
- TODDLER GIRL SHOES: A perfect gifts, these girls footwear make a fun surprise for birthday, holiday, Christmas gift, school shoes for toddler girls. ideal presents for toddler girl and little girls

- Court-inspired shoes for kids with bold Mickey Mouse identity.
- REGULAR FIT: Not tight and not loose, the perfect in-between fit
- ELASTIC LACES AND HOOK-AND-LOOP STRAP: Elastic laces with a top strap closure provide a secure and adjustable fit
- Officially licensed Disney product

- 【Lightweight and Breathable】The upper of running shoes is made of highly elastic knitting fabric, which is light and breathable. The densely woven net builds a three-dimensional upper surface that comfortably wraps the ankle. The soft fabric will expand and expand with the feet, maximizing the breathability and keeping the feet dry.
- 【Slip-resistant and wear-resistant】Upgraded non-slip EVA sole is not only light in material, but also has good elasticity and wear resistance.The uneven sole pattern can also increase the friction and improve the grip effect.
- 【Shock absorption】The high quality elastic EVA material can minimize the shock and impact on the feet. It also comes with an elastic insole that minimizes heel vibration and provides energy circulation.
- 【Inner Material】The flexible material coupled with the soft and breathable liner makes sure you stay comfortable running around while providing underfoot cushioning and support,give you a comfortable foot feel.
- 【COMFORTABLE and stylish】 These dynamic casual women's shoes offer a new level of comfort and great performance, these shoes are suitable for walking, tennis, running, casual, indoor, outdoor, sports, gym, exercise, travel, workout, exercise, and any other activity. These well-designed women's sneakers are perfect for any season.

- Embrace a blend of classic Disney charm and everyday comfort with the Ladies' Minnie Mouse Low Court Sneakers. Ideal for fans of the iconic character, these sneakers combine stylish design with practical features for a perfect addition to your casual footwear collection.
- MINNIE MOUSE: Created by Walt Disney in 1928, Minnie Mouse has become one of the most beloved cartoon icons of all time. As the cheerful and stylish counterpart to Mickey, Minnie is known for her signature look: white gloves, a polka-dotted dress, a bow, and low-heeled shoes that sometimes sport cute ribbons. As a longtime mascot of The Walt Disney Company, her charm and timeless style continue to capture hearts around the world.
- DESIGNED FOR DURABILITY! Crafted from high-quality Polyurethane (PU), these Minnie court sneakers are engineered to withstand your active lifestyle. Whether you're navigating indoor spaces or tackling outdoor adventures, these shoes offer exceptional grip and long-lasting durability on any surface. Built to keep pace with your every move, they're ready to support you through every step of your journey.
- BREATHABLE AND LIGHT AS AIR! Keep your feet cool and dry with these lightweight, breathable sneakers designed for year-round comfort. Featuring a padded instep and arch support, they offer superior cushioning and comfort, perfect for everyday wear. Whether it's a sweltering summer day or a crisp fall afternoon, these shoes ensure you stay comfortable in any weather.
- DISNEY MAGIC IN EVERY STEP! Embrace the charm of Disney with our stylish Minnie Mouse-themed sneakers. Featuring a vibrant, playful design, these shoes add a touch of Disney magic to every outfit. Perfect for expressing your love for a classic character, while enjoying the all-day comfort and fun, illuminated style that makes every step a bit more magical.

- DISNEY SHOES: These Frozen toddler girl shoes are an officially licensed girl’s footwear product. These Frozen toddler girls’ shoes are great for active little girls that love Elsa and Anna or any Disney cartoon characters.
- GIRLS LIGHT UP SHOES: Frozen shoes come in so many colors; Blue, purple, pink, white, silver with LED lights, they light up with every step. Elsa shoes are great for little girls to play like her favorite princesses, indoor or outdoor all day long.
- COMFORTABLE SHOES FOR TODDLER GIRLS: Frozen sneakers are made with high quality soft materials. Light up toddler shoes provide the perfect fit with a non-slip gripped outsole helping kids walk with excellent traction.
- SUPPORT: These Frozen shoes with lights provide the perfect fit with hook-and-loop closure that will help your baby girl get ready fast.
- GIFT FOR TODDLER GIRLS: These Frozen Toddler Tennis shoes make an excellent gift for little girls' for her birthday party, Christmas or holidays.

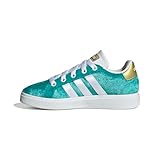
- Women's lightweight running-inspired sneakers for everyday wear
- MESH UPPER: Textile and synthetic mesh upper for breathability and light weight
- TEXTILE LINING: Textile lining provides a soft, comfortable feel
- CUSHIONED MIDSOLE: Cloudfoam midsole for step-in comfort and superior cushioning
- RUBBER OUTSOLE: The rubber outsole provides outstanding grip and a sleek, low-profile look
- Princess Jasmine-inspired shoes for kids to ride the magic carpet.
- REGULAR FIT: Not tight and not loose, the perfect in-between fit
- RUBBER OUTSOLE: The rubber outsole provides outstanding grip and a sleek, low-profile look
- Officially licensed Disney product
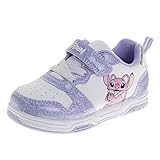
- DISNEY ANGEL SNEAKERS FOR GIRLS: If your little one loves Lilo & Stitch or the adorable Angel character, these sparkly Disney girls’ sneakers are the perfect everyday shoes filled with fun, comfort, and magic!
- GIRLS ATHLETIC SHOES: These lightweight Angel character sneakers are great for toddlers and little kids. Easy slip-on with strap closure, perfect for school, playground, daycare, walks, playdates, and all casual activities indoors or outdoors.
- TODDLER SNEAKERS: These cute girls’ tennis shoes feature pastel lavender glitter panels, white uppers, and a sweet Angel design. Available in sizes 6–12 Toddler/Little Kid, made for little girls who love stylish and colorful footwear.
- PERFECT FOR EVERYDAY WEAR: Great for running, playing, and weekend fun these Angel sneakers pair perfectly with leggings, jeans, skirts, dresses, or any casual outfit. Ideal for birthdays, school days, vacations, and family outings.
- LILO STITCH AND ANGEL GIFTS FOR GIRLS: These Angel shoes make the best gift for girls who love Lilo & Stitch! Perfect for birthdays, Christmas, holidays, or any special occasion for toddlers and little kids who adore Disney characters.
Step Up Your Game: The Ultimate Buying Guide for Tennis Shoes at Disney
Planning a trip to the Disney parks? You will walk miles. Choosing the right footwear is super important. You need shoes that feel good all day long. Forget fancy looks; comfort and support rule here. This guide helps you pick the best “tennis shoes” for your magical marathon.
1. Key Features to Look For
When buying shoes for Disney, think about what you will actually do. You are not playing tennis; you are walking, standing, and maybe running for a parade spot.
Support and Cushioning
- **Arch Support:** Good shoes hug your foot’s natural curve. This stops your feet from getting sore by lunchtime. Look for shoes with solid built-in arch support.
- **Shock Absorption:** The pavement in the parks is hard. You need a thick, bouncy sole. This material soaks up the impact every time your foot hits the ground.
Fit and Security
- **Lace System:** Make sure the laces let you tighten the shoe just right. A secure fit stops your heel from slipping out, which causes painful blisters.
- **Toe Box Space:** Your toes need wiggle room. Feet swell up after walking all day. A narrow toe box will squeeze your toes painfully.
2. Important Materials Matter
The materials used in the shoe greatly affect how long they last and how cool your feet stay.
Uppers (The Top Part)
Mesh is your best friend at Disney. Breathable mesh uppers let air flow in. This keeps your feet cool and dry, fighting off sweat and odor. Avoid heavy leather shoes; they trap heat.
Midsoles (The Cushioning Layer)
EVA foam (Ethylene-vinyl acetate) is a common, lightweight material for midsoles. It offers great cushion without weighing you down. Some premium shoes use specialized foams for extra bounce.
Outsoles (The Bottom Grip)
You need rubber outsoles. Rubber grips the ground well. This is important when you walk quickly or when the ground is slightly wet from a sudden rain shower. A durable outsole lasts longer.
3. Factors That Improve or Reduce Quality
Quality is about how well the shoe holds up over many hours of use.
What Improves Quality?
- **Seamless Construction:** Fewer stitches mean less rubbing. Shoes with smooth interiors reduce the chance of blisters forming.
- **Durable Heel Counter:** The back part of the shoe that cups your heel should be firm. A strong heel counter keeps your ankle stable during long periods of standing.
What Reduces Quality?
- **Thin Insoles:** If the insole feels flimsy, the shoe will quickly feel flat and uncomfortable. Cheap insoles compress too fast.
- **Excessive Flexibility:** While some bend is good, a shoe that folds completely in half offers zero support for long-distance walking.
4. User Experience and Use Cases
Think about your specific Disney day.
Morning Rush vs. Evening Stroll
For the morning rush, you need quick responsiveness and lightweight design to power through rope drop. In the evening, cushioning becomes the priority as your feet are already tired.
Weather Preparedness
Florida weather changes fast. Choose shoes with light water resistance if you plan to ride splash mountains. However, if rain is heavy, fully waterproof shoes can get hot and trap sweat. Breathability usually wins over full waterproofing for a typical park day.
10 Frequently Asked Questions (FAQ) for Disney Footwear
Q: Do I really need brand new shoes?
A: No, but you need shoes you have already broken in. Never wear brand new shoes to Disney for the first time. Always wear them for a few weeks first to ensure they fit perfectly.
Q: Are running shoes okay instead of tennis shoes?
A: Yes! Running shoes are often better. They are designed for impact absorption and long periods of movement, which is exactly what you do in the parks.
Q: Should I bring two pairs of shoes?
A: Many experts suggest bringing two pairs. You can switch shoes halfway through the day. This gives your feet a break from the pressure points of one specific shoe style.
Q: What color is best for Disney walking shoes?
A: Lighter colors like white or light gray show less dirt if you step in puddles. However, dark colors hide scuffs better. Choose what you like, as long as they are comfortable.
Q: How thick should the sole be?
A: Aim for at least one inch of cushioning material (the midsole). Thicker soles usually mean more protection from the hot pavement.
Q: Will my feet swell up in the heat?
A: Yes, feet often swell in warm weather. This is why you must choose a shoe that is slightly large, not one that fits snugly when you try it on in the morning.
Q: Are slip-on shoes a good idea?
A: Slip-ons can be convenient for quick security checks. However, they usually offer less ankle and arch support than laced shoes, which can cause problems later in the day.
Q: How long should my shoes last in the parks?
A: A good quality pair of walking shoes should easily last you four or five full, intense days at the parks before you start feeling significant fatigue.
Q: Should I wear thick or thin socks?
A: Wear moisture-wicking socks (like wool or synthetic blends), not thick cotton socks. Cotton holds sweat, which leads to blisters. The sock thickness should match what you wore when you broke the shoes in.
Q: What if my shoes get soaked from a ride?
A: If your shoes get wet, change them immediately if you have a backup pair. If you must keep wearing them, try to dry them out by stuffing them with newspaper overnight. Wet shoes cause friction and blisters.